I will try to blog a bit more and I will try to get back into being more creative with my cooking and baking. I realise I let this go last year when I became busier with work, and although I did make some fab food, and cook some new recipes I failed to share the delightfulness with you lovely folk!
So to make up for it here is some of what happened between the last post and now...I'll post the recipes if I can find or remember them otherwise please enjoy the drool-worthy photos below! (also I wrote this blog mostly while watching Flight of the Navigator!!)

****
Then not long after in July both Scott and Anita shared their birthday weekend. After a day full of monkeying around at Go Ape we presented them each with their own cake. Anita received the brightest most cheerful butterfly we could possible think of! We reverted to our young girl days when we covered this one with sprinkles! And Scott thought he could trick us by requesting an upside down pyramid cake. Well next time he needs to learn to be more specific and ask for his cake to be 3D. See Scott's pyramid below complete with little Scotts riding camels! Scott's cake is made from vanilla sponge, the butterfly body is the same vanilla sponge, the wings are from a wholemeal chocolate sponge recipe.
 |
| the lollipops on the right were meant to be the antenna :) |
Chocolate Birthday Cake (makes one cake)
Ingredients:
140 g butter, plus extra for greasing the tin
175 g golden caster sugar
2 eggs
225 g self-raising wholemeal flour
50 g cocoa powder
1/4 tsp bicarbonate of soda
250 g natura yogurt
Method to the madness:
1. Heat the oven to 180C/ fan 160C / gas 4. Butter and line the base of a 18x28cm cake tin or tray. Put the butter and sugar into a bowl; beat together with electric hand beaters until light and fluffy. Add the eggs a little at a time, beating well between each addition.
2. Sieve the flour, cocoa and bicarbonate of soda into the bowl, then tip in any left in the sieve. Pour in the natural yogurt. Stir everything to a smooth mixture and spoon into the prepared tin. Bake fo 20-25 mins until just firm and shrinking away from the sides of the tin. Cool in the tin for 5 mins, then turn onto a wire rack to cool completely.
3. Once cooled completely ice. In this case we covered it with homemade royal icing then the rolled fondant. We stuck the chocolates and sprinkles on after brushing on some edible sugar glue.
voila!
****
Now that I'm going through my foodie pics...I'm realising I took a lot more baking photos then cooking ones! Ach well! Here's another cake!
We were heading over to a friends place for dinner (Thank you Angela and Bruno for introducing us to Portuguese Old Lady Deliciousness!) and I thought since they were treating us to dinner I would provide the dessert. So I found this lovely Chocolate Fudge Cake recipe and thought I would give it a go! I have to say it is one of the most moist and gooey cakes I've made! It's also your lucky day because I found the recipe....check it out after the photos!
 |
| making the cake |
 |
| prepping the ganache like icing |
 |
| post baking and once adding the icing |
 |
| finishing touch of icing sugar sans star cutouts |
Chocolate Fudge Cake
Ingredients:
200g plain chocolate, broken into chunks (lower cocoa content)
200g butter
200g light brown muscovado sugar
100ml sour cream
2 eggs, beaten
200g self-raisin flour
5tbsp cocoa powder
Icing-
100g plain chocolate
170g can condensed milk
100g butter
Method to the madness:
1. Heat oven to 160C / 140V fan/ gas 3. Line a 22x22cm square tin with baking parchment.
2. Put the chocolate, butter and sugar into a pan with 100ml hot water and gently melt together. Set aside for 2 mins, then stir in the sour cream followed by the eggs. Finally, stir or whisk in the flour and cocoa until lump-free, then pour into the prepared tin. Bake for 50-55 mins until a skewer comes out clean. Sit the tin on a wire rack to cool
3. Now make the icing! Gently melt together the icing ingredients in a heatproof bowl over a pan of barely simmering water, then chill or cool until spreadable.
4. Now to decorate!!! Carefully turn the cooled cake and peel off the baking parchment. Spread the icing over the top...I had extra so I also let is drip lovingly over the sides! Then I drew some stars on parchment paper and cut them out. I put the stars around the cake and used a loose leaf tea strainer to sprinkle icing sugar over the cake. Then I carefully peeled off the stars. Another option would be to cover the cake in colourful sprinkles!
5. Cut it up and enjoy! Sharing with friends makes it that much more enjoyable! :)
****
Then not long after this Justin was in the kitchen making Chicken Nasi Goreng! We sometimes shop at the local Waitrose (largely to avoid the students in Tesco since it's a small shop and they eat everything before you can get there...) and we often pick up their free recipe cards at the till. That's where this recipe comes in! Photo of Justin in the kitchen and recipe following! P.S. I do enjoy when Justin is in the kitchen!!!
 |
| Chef Presseau |
Chicken Nasi Goreng
Ingredients:
1-2 tbsp sunflower oil
2 eggs, beaten
1 red pepper deseeded and finely chopped
200g baby leaf greens shredded
2 red chillis, deseeded and finely chopped
1 bunch of salad onions
2 x 250g Tilda Steamed Basmati Rice
200g of pre-prepped cooked chicken in sweet chilli sauce
2 tbsp soy sauce
2 tbsp of chilli garlic sauce (I didn't have this so I used a chilli garlic oil I buy from a local market)
about 6cm piece of cucumber, halved, seeded, sliced
Method to the madness:
1. Heat a splash of oil in a large non-stick pan or wok and once hot pour in the beaten eggs and cook for a couple of minutes on each side to make a large, thin omelette. Slide onto a large plate, roll up and cut into thin ribbons.
2. Add the rest of the oil to the pan and cook the pepper for 2 mins. Add the greens and cook for a further 3 mins on the highest heat so any water released by the greens evaporates.
3. Stir in half the chillies, the salad onions, rice and chicken and continue to cook for a further 5 mins until piping hot.
4. Stir in the soy sauce and chilli sauce and divide between bowls. Put some of the cucumber on top, and the omelette ribbons and any remaining chilli.
nom nom nom is all!
****
Following this I made some homemade pierogies. Pierogies are one of my all time favourite foods that I have been eating since I was young! They are surprisingly simple and easy to make and don't require too many ingredients. After boiling mine (which essentially cooks the dough) I like to fry them up with some onions and bacon and serve them with sour cream - sometimes we like to have some delish Polish sausages from the local Polish Deli along with the pierogies!
 |
| mixing the dough |
 |
| cooking the onions for the fill |
 |
| boiling the potatoes for the fill |
 |
| mix onions and cheddar |
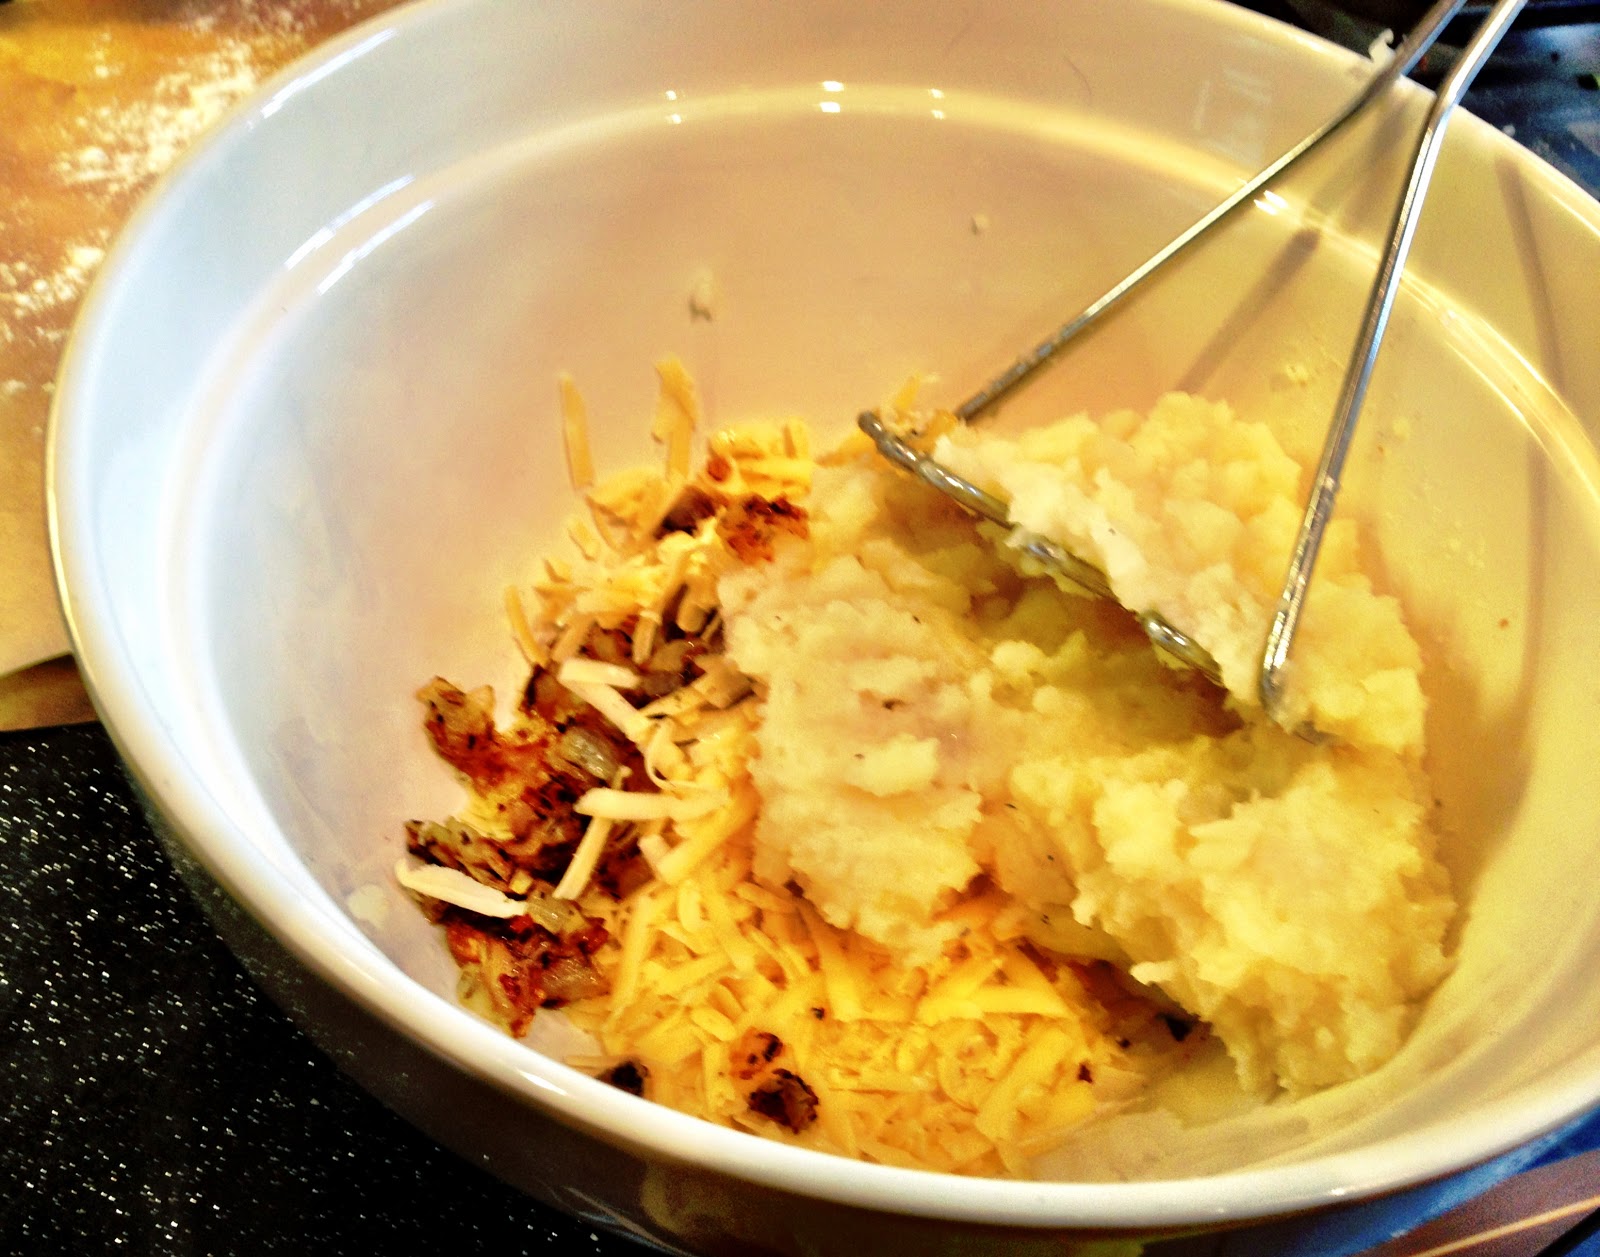 |
| mixing in the cooked potatoes and mash together |
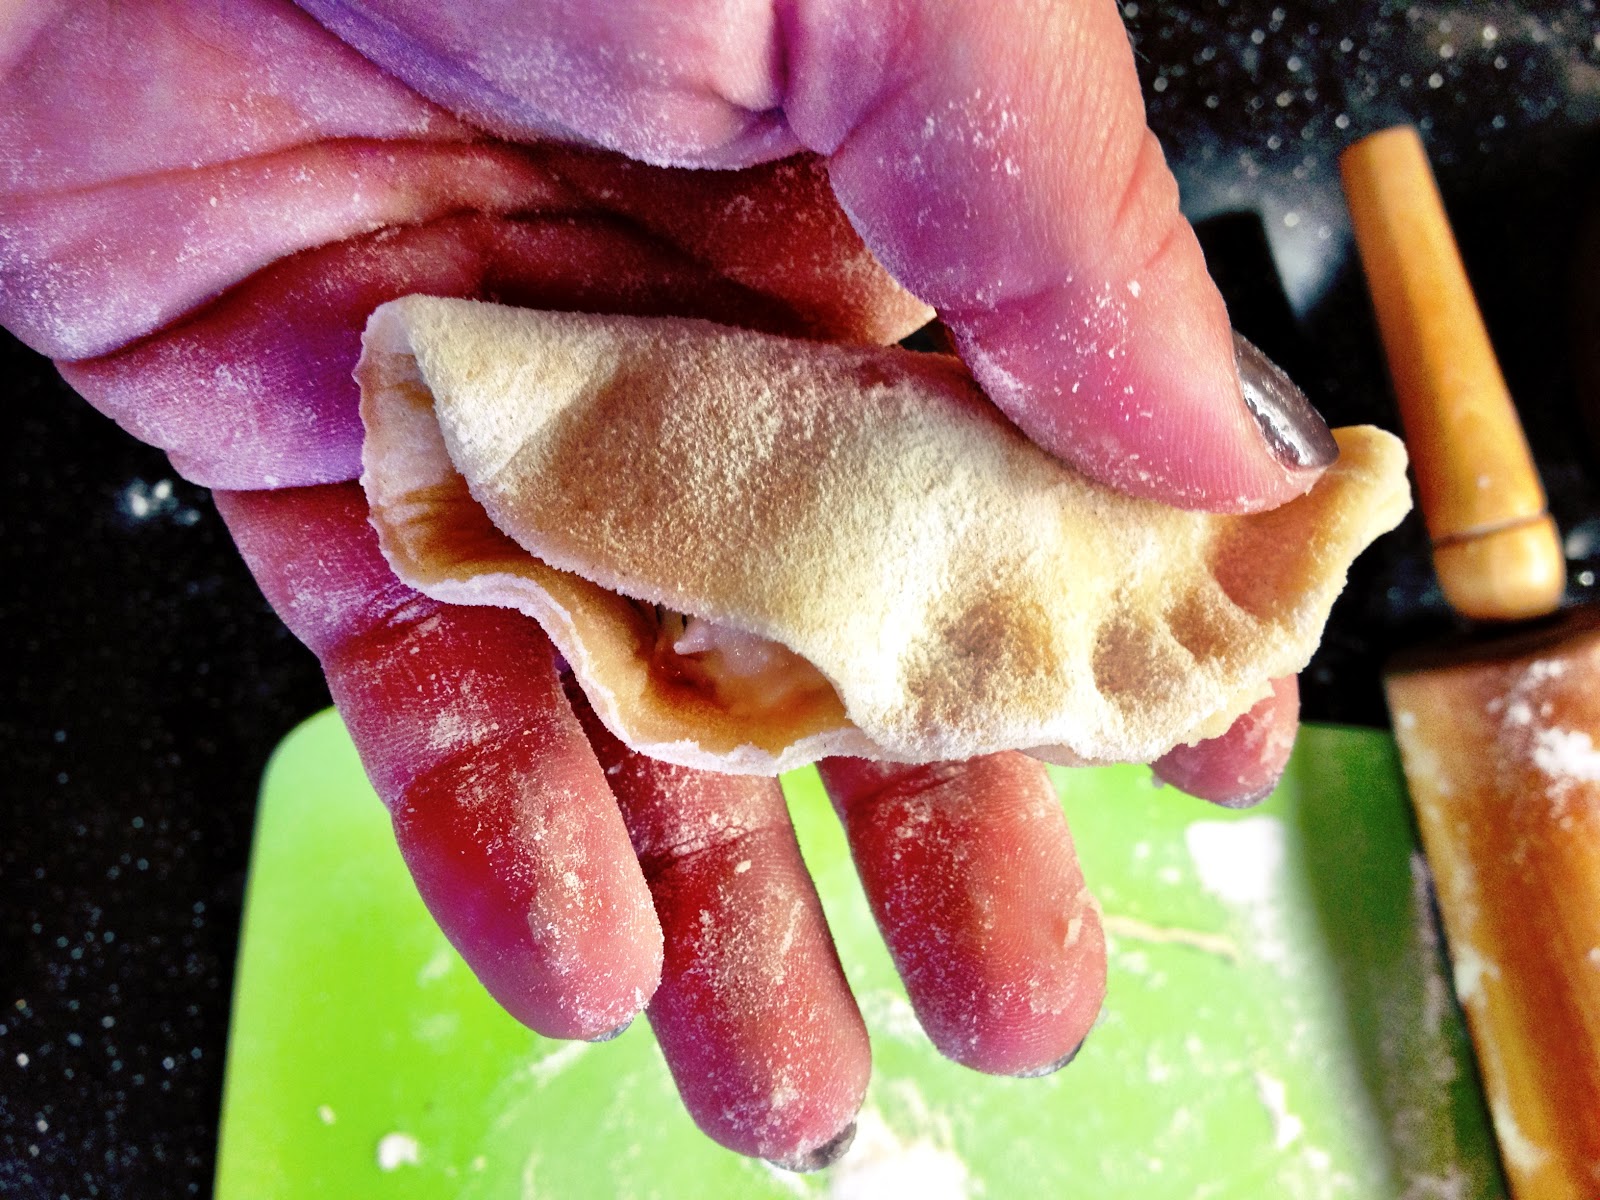 |
| after rolling out the dough and cutting circles with a pint glass...put a small spoonful in and pinch to close |
 |
| drop into bowling water until they rise to the top |
 |
| start to cook up some chopped up bacon and onions |
 |
| add the boiled pierogies to the pans, once golden on one side flip them over and mix with bacon and onion to flavour |
 |
| the finished product! eat that with some sour cream! nom nom! |
Ingredients:
Dough-
3 and 1/2 cups of flour, plus more for dusting
3 large eggs
2 tbsp sour cream
3/4 to 1 cup of water
Filling -
1.5lbs baking potatoes, peeled and cut into small cubes
2 tbsp unsalted butter
1 tbsp olive oil
1 small white onion
1 clove of garlic, minced
1 cup (at least) of chedder
salt and pepper to taste
to finish - bacon and another small white onion and to really really finish - eat with sour cream
Method to the madness:
Dough
1. In a large bowl mix together flour, eggs, sour cream, 1/2 cup of water. Beat the eggs as you mix and after that slowly add the rest of the water.
2. The fun part!! Lift the dough out onto a floured surface and knead it using a drop technique (lifting off the counter and dropping it again!) Knead only enough to blend the ingredients 3-5 mins, making sure not to over knead it! Wrap the dough ball in plastic wrap and leave for 20-30 mins while you prep in tasty filling!
Filling
1. Put the potatoes into a pot, and cover with enough cold salted water to soften them, boil for about 20-30 mins.
2. While the potatoes cook, melt some butter in a pan and add chopped onion and garlic, cooking slowly just until the onions are translucent, about 2 mins. Then turn the heat down and cook until caramelised, about 20 mins. You may need to add a bit more butter through this process. Also add some salt and pepper to flavour!!
3. Once the onions are done, set them aside to cool. At this point the potatoes should also be done, drain them, and squeeze out excess water. Mash them to get all the lumps out, then add in the onion mix and shredded cheese, mix together! Add some salt and pepper to taste!
Pierogies Assemble!!
1. Put the filling aside to cool while you roll out the dough. On a floured surface, roll the dough to about 1/8 inch thick. I like to use a pint glass to size them, so dip the pint glass in some flour and start to make little circles.
2. Add a small spoonful of the fill to the round dough. Fold the dough in half and start to gently pull and pinch the edges together. Make sure they are sealed tightly or you will lose your fill folks! Keep doing this until you either have no more fill, or no more dough! (I never seem to have exactly the right amount...)
3. Start boiling some water in a medium size pan. Once it's come to the boil, drop the pierogies in, no more then 5-6 at a time. Once the pierogies float to the top, use a slotted spoon to scoop them out. I then put them on some parchment paper while finishing the rest.
4. Then you could just fry them in a pan with butter, but I like to first cook up some chopped up smokey bacon, and some white onion, when they are about half way being cooked I add the pierogies in and let them brown on one side, then turn them over. Once nicely cooked I take them out and serve with a bit of sour cream. Sometimes I will also serve it with some Polish kielbasa sausage!
****
Karen celebrated her birthday in Newcastle!!! Yaayaya! My dear friend Karen brought herself and the Aberdeen crew down to Newcastle for her birthday weekend in September! When the lot of us are together we always have some fab food excursions! We went to Nudo for supper, but on her birthday morning I made mimosas, fresh croissants and a delish fresh raspberry cake! Pictures below!!
 |
| the delish raspberry cake complete with crackle candy on top! |
 |
| our birthday morning feast! |
 |
| the lot enjoying breakfast! |
 |
| Karen enjoying her birthday duck pancakes from Nudo! |
****
To celebrate a new friends new life in Newcastle we all went to his place for some drinks, closely followed by an interesting night as we stumbled across a fab hipster style dance party in a local church hall. My treat to this party were Pie Pops!!! I have to say because I was short on time I cheated and used store bought shortcrust pastry! But I mixed the raspberries and strawberries with icing sugar all on my own before putting them on the pastry! The pics below are pretty self explanatory!
 |
| raspberries and icing sugar |
 |
| chopped strawberries and icing sugar |
 |
| pastry, beaten egg glue and the tools |
 |
| filling the pastry |
 |
| fill, lolli stick , add pie top, pinch and seal |
 |
| Bake! |
 |
| Eat! |
 |
| Enjoy!! |
Ok so now we are in to October and Canadian Thanksgiving! This was the first time I chose to make a Canadian Thanksgiving dinner. It was much more than I thought..... I had loads and loads of fun and I think the 11 people I fed mostly enjoyed the meal. We had gammon, turkey, roast potatoes, sweet potato casserole, honeyed parsnips, stuffing, two types of gravy and pies! I have to say I was disappointed with my turkey. First time ever doing it frozen and I personally felt it was overcooked and a bit dry..disappoint. From now on I will always stick to fresh!!! Always! Other than that it was yum and I made some pumpkin pie, tarte au sucre and pet de soeur! See below for yumminess! (sorry, I need to dig for the recipes....if you really want any of them let me know and I will do the digging)
 |
| pet de soeur! |
 |
| pumpkin pie! |
 |
| Josanne's mini pumpkin pie! |
 |
| tarte au sucre |
 |
| the whole lot!!! |
****
The next recipe is one that was really simple but really delish! I decided to make homemade calzones! I cheated a little bit to save time and used my bread maker to make and proof the dough. But I do have a fab pizza dough recipe if anyone wants one!
Photos below and rough recipe follows!
 |
| fill!! |
 |
| baking!!! |
 |
| baked! |
 |
| ready to eat! |
(apologies in advance for the rubbish directions....I've been at this for over an hour now and I'm losing steam...happy to embellish upon request and always happy to answer questions!!!!)
Ingredients:
dough of your choosing - I used my bread maker (give me a shout if you want another recipe option!)
1 jar of tomato sauce of your choosing
fill-
fresh mozza
chopped ham
pepperoni
fresh basil, chopped
sausage of your choosing - cooked and cut into small bits
Method to the madness:
1. Cut up the pepperoni and sausage, basil, tear up the cheese mix all together along with ham and put it to one side
2. Once mixed and proofed, roll your dough out like you were going to make a small pizza.
3. Put a tiny bit of sauce on one half of the pizza dough. Then put half of your filling on that same one half.
4. Pull the other half of the dough over and pinch together at the edge. Then starting at one end, grab the edge of the dough from underneath and roll up to create a crust. Continue all along the edge. Do the same to the other calzone.
5. Bake in the oven at 200C fan, until when you tap on the top it sounds hollow and is golden brown. (this is one of those instructions that bothers some people because it's not an exact time....if you want an exact time I'll try to remember to time it next time, but having worked in a pizza restaurant for some time I'm a bit too in tune with pizza readiness to have exact timings)
6. While the calzones are baking in the oven, heat up your tomato sauce. When the calzones come out, top with sauce and garnish with fresh basil. If you are a cheese fiend you could also put some more cheese on top!
****
Ok....with this next one I decided to get a bit more experimental and do some fusion cooking! A little Italian-Asian Fusion! And fortunately it turned out and was actually really really delish!!!! I have to say, with this recipe I was banking on the fact that most dishes I make with my chilli-garlic oil always turn out...
 |
| some of the ingredients I had around the house!!!! |
 |
| reheating the already cooked ingredients |
 |
| adding the kale! |
 |
| adding the noodles! |
 |
| finished product garnished with fresh salad onions |
Leigh's Italian-Asian Fusion
Ingredients:
udon noodles
prawns
sausage (cooked) - I used pork and leek here
kale
chilli-garlic oil
salad onions
Method to the madness:
1. I used some leftover sausages from the day before, if you're doing with from fresh cook your sausages and then cut them into little bits.
2. Put a tbsp of the chilli-garlic oil in a pan, add the sausage and prawns. Then add in the chopped kale.
3. After about 2 mins, add in the udon noodles following the cooking instructions on the pack. Stir constantly.
4. Once it is done, scoop into two bowls and garnish with fresh salad onions.
****
Ok....I think I'm pretty much done for this post now.....mostly caught up....missing a few savoury recipes here and there but I'm sure I'll make them again sometime soon and share the love with all you fine folks!
I hope you enjoy these tasty treats! Do let me know if you try any!
Love!
x
No comments:
Post a Comment